
Polymer clay modeling opens a wide range for creativity. From it you can do almost anything: from buttons for a fur coat to a vase in the style of antique. The polymer clay also makes it possible to imitate many jewelry techniques, which makes it popular among jewelry masters. Today we will deal with a simpler technique - smearing. Despite all the seeming simplicity of the process, even such a technique requires a certain skill and patience. So today we will have such wonderful bullfinches.
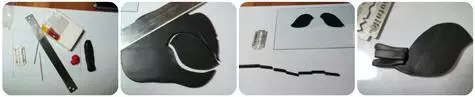
To create these feathers, we will need:
1. Sheet A4.
2. Blade (or special, or satellite type)
3. Needle Sewing
4. Polymer clay 3 colors (black, red, white)
5. Glass for baking (can be a secret or something else to adapt for 130 degrees in the oven)
6. Basin base for brooches
7. Glue "Contact"
8. 3 hours free from home trouble
So, begin. To begin with, take approximately the black plastic paste, carefully dismissed it and rolling the layer with a thickness of about 3-4 mm. Cut out the arbitrary shape of the future bird. You can pre-make patterns from paper, you can arbitrarily. I do it immediately on the glass to baked, so as not to "injure" the workpiece. Rassed, cut out, postponed. Now we will take a tail (you can, of course, cut immediately, but I wanted a little volume). Roll over a black sausage with a diameter of about 3 mm, cut on each bird of 3 lumps (better more authentic, you can always cut off). Sowing something flat (glass, hopping) and apply bird billets. It turned out the tail.
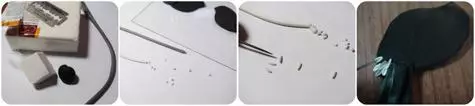
Next, make the blanks for future feathers. We need white, gray and red. We mix in the proportion of ¼ white and black plastic to get gray. Roll over white, gray and red into long sausages with a diameter of about 1.5-2 mm. Cut the white sausage on the circles with a thickness of about 1 mm, roll off an arbitrary amount in the palms in the "grains", then apply the grains to the bottom of the body of our bulk and add the needle to the sharp edge. It turns out an improvised feather. And so throughout the bottom.
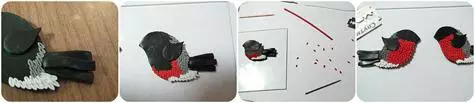
In the same way, lay gray feathers. To make it easier, you can gently read the needle on the blank the contours for different colors. At this stage, we also cut out of the black plastic wing (in the form of a droplet) and apply to the workpiece. We continue to lay out feathers. Uncooked left, wing and tail.
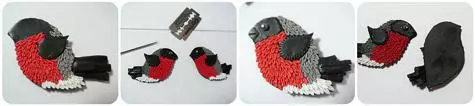
Our future bullfinch has already acquired a plumage. Ib must make notches along the edge of the wings, the tail (if it is long, you can cut) and heads. We plan key and eyebound. Shot a small black ball, on top of a white ball, much less, designate the eye. You can draw a white point with acrylic paints. We admire the bullfight and send to the oven for half an hour at a temperature of 130 C. We remember that at a lesser temperature, the plastic will break, with a greater can burn. Therefore, watch carefully, very good if you have a special thermometer for the oven.
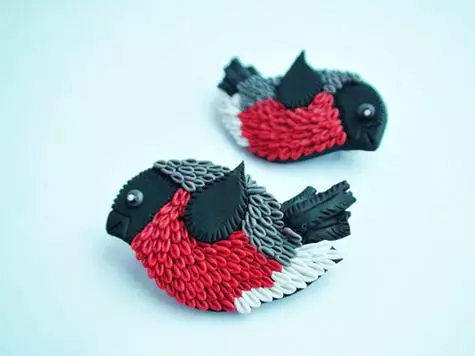
Take out, cool. With the help of "Contact" adhesive or other suitable, we glue the fastener and vio-la - our bullfinch is ready!
Successful creativity, Anastasia Kaurdakova (AnSty).